Transform Roses in 7 Easy Steps with This Surprising Propagation Trick!
Transform Your Roses with This Surprising Propagation Trick
Introduction
Have you ever come across a stunning rose bush that made you wish you could have more blooms in your garden? The delicate petals and captivating fragrances often inspire you to get creative. What if I told you that you can easily transform your existing roses into new plants with just a few simple steps? This article will guide you through a surprising propagation trick that can help you grow beautiful roses without spending a fortune. Let’s dive into the world of rose propagation!
Benefits of Rose Propagation
Propagating roses not only helps you expand your garden but also enhances your connection with nature. Here are a few key benefits:
- Cost-effective: Instead of purchasing new rose plants, you can create them from your existing ones.
- Customized varieties: Propagation allows you to replicate your favorite rose types, ensuring that every bloom is precisely what you want.
- Environmental benefits: By propagating your roses, you contribute to sustainability and reduce waste in the gardening community.
Materials Needed
Gathering the right materials is crucial for successful rose propagation. Here’s what you’ll need:
- Healthy rose stems: Choose stems that are strong and healthy for the best results.
- Sharp scissors or pruning shears: Ensure you have a clean cut to help prevent disease.
- Potting soil: A quality mix that retains moisture but offers good drainage is ideal.
- Small pots or containers: These will hold your new rose cuttings.
- Clear plastic bag: This will help create a humid environment for your cuttings.
Step-by-Step Guide
Now, let’s get into the heart of the process. This step-by-step guide will walk you through propagating your roses:
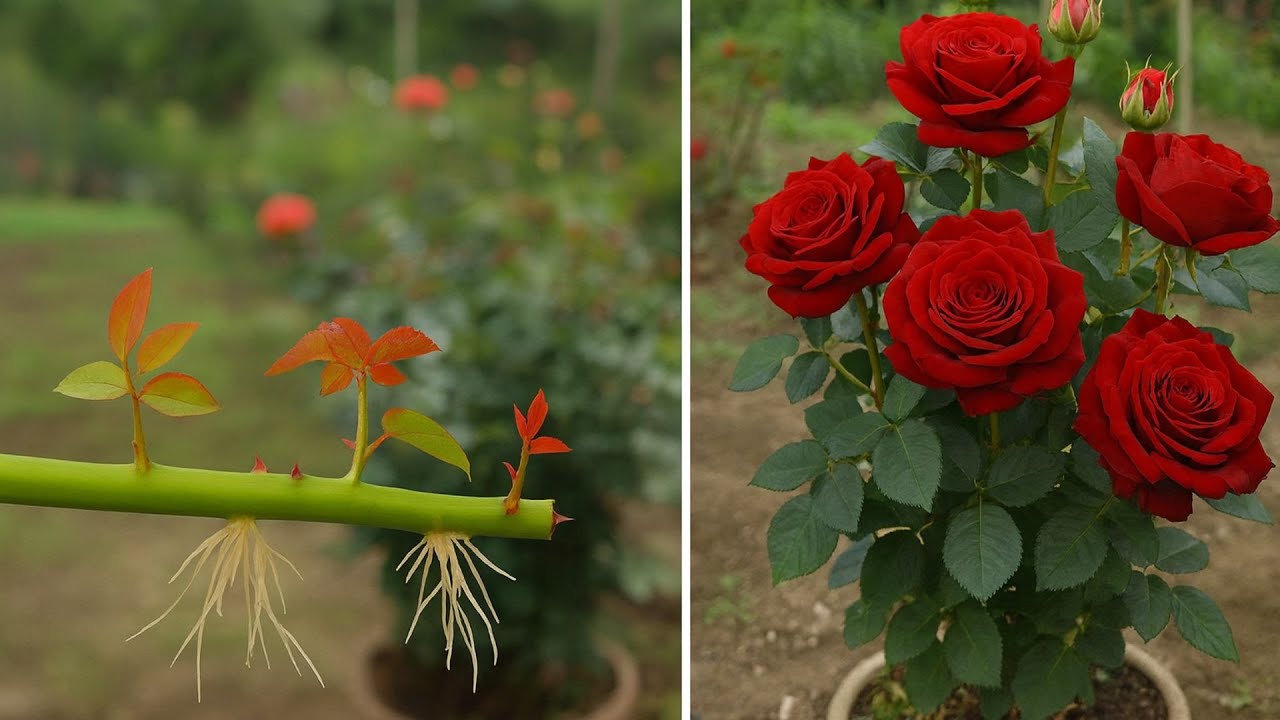
Step 1: Choose the Right Stems
Select stems that have at least three sets of leaves. Healthy stems should appear robust and be devoid of any diseases.
Step 2: Make the Cut
Using your sharp scissors, cut the stem at a 45-degree angle, about 6 inches long. Aim to have a cutting with at least two leaves.
Step 3: Remove Lower Leaves
Strip the lower leaves from the cutting, leaving just a couple on top. This prevents the leaves from rotting in the soil.
Step 4: Prepare the Soil
Fill your small pots with potting soil, ensuring it’s moist but not soggy.
Step 5: Plant the Cuttings
Make a small hole in the soil and gently place the cutting inside, firming the soil around it to provide support.
Step 6: Create Humidity
Cover the pot with a clear plastic bag to create a greenhouse effect. This keeps humidity levels high, which is vital for root development.
Step 7: Monitor and Wait
Keep the pot in a lightly shaded area and water the soil as needed. Remove the bag periodically to allow air circulation. Roots should begin to form in a few weeks.
Common Mistakes
Here are some common mistakes to avoid during the rose propagation process:
- Using weak or diseased stems can result in unsuccessful propagation.
- Overwatering your cuttings can lead to root rot and ultimately fail the propagation.
- Failing to provide humidity initially may cause the cuttings to dry out.
- Neglecting to monitor the cuttings can lead to them becoming leggy due to lack of sunlight.
- Rushing the process by not waiting long enough for roots to develop may result in unsuccessful planting.
FAQ
How long does it take for rose cuttings to root? Typically, it can take between 2 to 8 weeks for rose cuttings to develop roots, depending on the variety and conditions.
Can I propagate any rose type? Most rose varieties can be propagated, but some, like hybrid teas and certain floribundas, may have a higher success rate.
What is the best time to propagate roses? The best time for propagation is during the growing season, typically in late spring or early summer.
Conclusion
With simple materials and a bit of patience, you can easily propagate your roses and enjoy more blooms in your garden. Have you tried propagating roses before, or is this your first attempt? Share your thoughts in the comments below!