Grow Roots on Roses Overnight: 5 Simple Steps to Transform Your Garden!
Transform Your Garden: 5 Simple Steps to Grow Roots on Roses Overnight
- Introduction
- Understanding How Roses Root
- Required Materials
- Step-by-Step Guide
- Common Mistakes to Avoid
- FAQ
- Conclusion
Introduction
Have you ever wondered why some roses thrive while others struggle to grow? If you find yourself staring at a wilted rose bush or a few stems that seem like they need rescue, you’re not alone. Many gardeners experience difficulties with ensuring that their roses take root properly. The good news is that with the right approach, you can encourage your plants to flourish. Dive into this guide to discover how you can transform your garden by promoting root growth on your roses.
Understanding How Roses Root
Before you start the rooting process, it’s important to understand what makes roses unique. These beautiful plants require specific conditions for successful root development.
Why Roses Need Special Care
Roses are sensitive to changes in their environment, and their susceptibility can make rooting challenging. Paying attention to their specific needs will enhance your success rate. They typically thrive in well-draining soil and require consistent moisture.
The Best Time for Rooting
The ideal time for propagating roses through cuttings is during the early spring or late summer. This timing aligns with their natural growth cycle, providing a better chance for them to establish roots quickly.
Required Materials
Gathering the right materials is a vital step for successfully growing roots on your roses.
- Secateurs: A sharp pair will help you make clean cuts.
- Rooting Hormone: This encourages quicker root development.
- Pots: Choose pots with good drainage for planting.
- Potting Soil: A well-draining mix is essential.
- Plastic Bags: These will help maintain humidity around your cuttings.
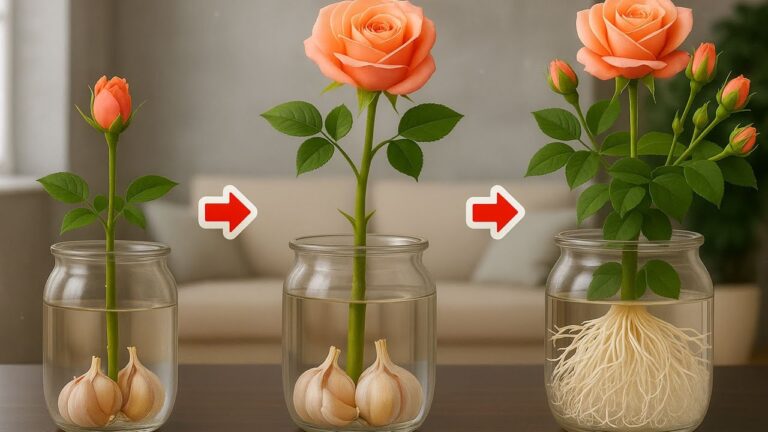
Step-by-Step Guide
Once you have your materials ready, follow these five simple steps to grow roots on your roses overnight.
- Take Cuttings: Choose healthy stems that are about 6-8 inches long and have at least 2-3 leaf nodes.
- Prepare Cuttings: Remove the lower leaves and dip the cut end in rooting hormone to promote growth.
- Plant in Pots: Fill your pots with potting soil and make a hole in the center for your cutting. Firm the soil around it.
- Water Thoroughly: Give them a gentle watering, making sure the potting mix is moist but not soggy.
- Create Humidity: Place a plastic bag over the pot to create a mini green house effect, which retains moisture.
Helpful Tips for Success
- Keep the cuttings in indirect sunlight.
- Check the moisture level regularly to ensure the soil does not dry out.
- Remove the plastic cover for a short time each day to let fresh air circulate.
Common Mistakes to Avoid
While rooting roses can be straightforward, gardeners often encounter pitfalls. Here are some common mistakes you should avoid.
- Using old or unhealthy cuttings: Always select fresh stems for the best chances of successful rooting.
- Overwatering: Too much moisture can lead to root rot, so ensure your pots have good drainage.
- Ignoring sunlight: While indirect light is suitable, placing cuttings in complete darkness can hinder growth.
- Neglecting humidity: Failing to maintain humidity can dry out the cuttings rapidly, stunting growth.
FAQ
What kind of roses can be propagated this way? Most blooming roses can be propagated through cuttings, including hybrid tea and shrub roses.
How long does it take for the cuttings to root? Typically, it takes a few weeks to see healthy root development, but this can vary depending on conditions.
Can I root roses in water? While possible, rooting roses in soil is generally more effective than in water for long-term growth.
Conclusion
By following these straightforward steps, you can successfully grow roots on your roses and enhance your garden’s beauty. Have you tried propagating roses before? Share your experiences in the comments below!